Sandpaper Grit Guide: Choosing the Right Grit for Every Project
TL;DR: Sandpaper grit numbers tell you how aggressive the cut is. Lower numbers rip material off fast but leave deep scratches. Higher numbers polish things smooth but take forever if you skip steps. The secret? Work your way up through the grits in order and never skip more than one step. It’s not glamorous, but it’s the difference between a professional-looking finish and something that looks like you sanded it with a brick.
| Category | Grit Range | Best For | Our Top Pick |
|---|---|---|---|
| Best Overall Variety Pack | 80/120/180/220/400 | Covers 90% of projects | Diablo SandNET 50-Pack Assorted |
| Best Premium Discs | Various (sold individually) | Professional woodworking | Mirka Gold 5″ Discs |
| Best Budget Sheets | 60/100/150/220 | General DIY sanding | 3M Aluminum Oxide Assorted |
| Best Wet/Dry | 1000/1500/2000/2500 | Auto body, fine finishing | 3M Wetordry Assorted |
How Sandpaper Grit Numbers Actually Work
The grit number on sandpaper refers to the number of abrasive particles per square inch of the backing. A 60-grit disc has 60 large particles crammed into that space, while a 220-grit disc packs in 220 much smaller ones. More particles means finer scratches, which means a smoother surface.
Think of it this way: 40-grit is a cheese grater. 400-grit is a polishing cloth. Everything in between is a spectrum from “aggressive removal” to “surface refinement.” The key concept is that each successive grit removes the scratch pattern left by the previous one. That’s why skipping grits is the single biggest sanding mistake people make.
The Complete Grit Chart: What Each Range Does
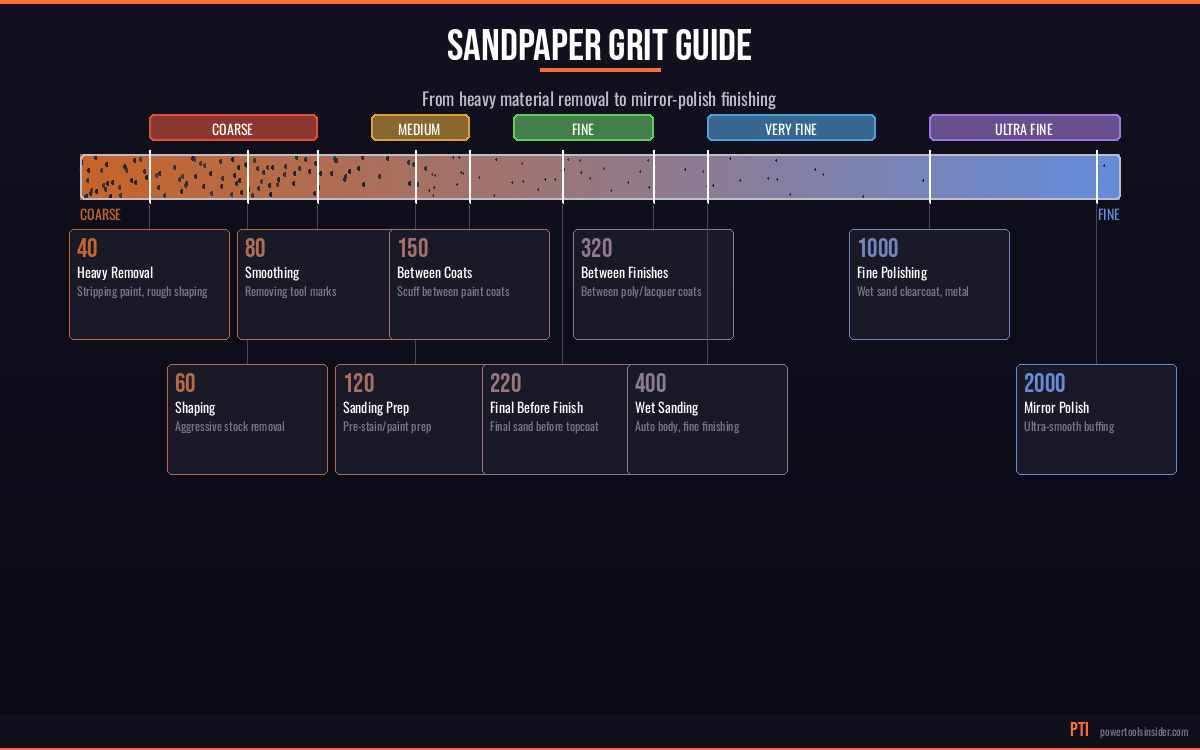
| Grit | Category | Scratch Depth | What It Does | Common Uses |
|---|---|---|---|---|
| 40 | Extra Coarse | Deep | Aggressive stock removal | Paint stripping, rust removal, heavy shaping |
| 60 | Coarse | Deep | Fast material removal | Rough shaping, old finish removal, leveling |
| 80 | Coarse | Moderate-Deep | Rapid smoothing after shaping | First pass on rough lumber, deck refinishing |
| 100 | Medium | Moderate | Removes 80-grit scratches | General purpose sanding, paint prep on bare wood |
| 120 | Medium | Light-Moderate | Standard prep grit | Pre-stain prep, drywall finishing, general smoothing |
| 150 | Medium-Fine | Light | Refines 120-grit scratches | Final prep before paint, hardwood prep |
| 180 | Fine | Very Light | Final sanding for stain | Pre-stain on hardwoods, between finish coats |
| 220 | Fine | Minimal | Final smoothing | Between polyurethane coats, final before clear coat |
| 320 | Very Fine | Micro | Finish coat prep | Scuff sanding between lacquer coats, fine furniture |
| 400 | Super Fine | Micro | Polish prep | Wet sanding finishes, auto clear coat prep |
| 600-800 | Ultra Fine | Near invisible | Surface polishing | Auto body work, lacquer rubbing, metal finishing |
| 1000-1500 | Micro Fine | Invisible | Final polish | Wet sanding clear coat, headlight restoration |
| 2000-3000 | Micro Fine | None visible | Mirror polish | Final auto body polish, metal mirror finish |
Project-Matching Guide: What Grit for What Job
Wood Finishing (Furniture, Cabinets, Trim)
This is where most DIYers screw up sanding. The goal is a surface smooth enough that stain or finish absorbs evenly without blotchiness.
Progression: 80 → 120 → 150 → 180 (for stain) or 220 (for paint/poly)
- Start at 80 only if the wood is rough-sawn or has mill marks. If it’s already smooth from the lumberyard, start at 120.
- Sand with the grain. Always. Sanding across the grain creates cross-scratches that show through stain like a neon sign.
- Stop at 180 for stain. Go higher and the wood won’t absorb stain evenly because you’ve burnished the pores closed.
- Stop at 220 for polyurethane or paint. Higher grits are wasted effort here.
Paint Preparation
Whether you’re prepping bare wood, scuff-sanding between coats, or stripping old paint, the grit matters.
Bare wood before primer: 120 → 150
Between primer coats: 220
Between paint coats: 320
Stripping old paint: 60 → 80 → 120 (or use a chemical stripper and save your arms)
Metal Prep and Rust Removal
Metal is harder than wood, so your sandpaper wears out faster. Use aluminum oxide or ceramic abrasives for metal work.
Rust removal: 40 → 80 → 120
Before primer on metal: 120 → 180
Polishing stainless steel: 220 → 400 → 600 → 800 → 1000+
Drywall Finishing
Drywall is soft and clogs sandpaper fast. Use sanding screens or no-clog sandpaper.
Joint compound smoothing: 120 → 150
Final pass before primer: 150 → 180
Never go below 100 on drywall — you’ll gouge through the paper facing.
Auto Body and Clear Coat
This is where the high grits live. Wet sanding is mandatory above 400 grit to prevent clogging.
Before primer: 180 → 320
Between primer and base coat: 400 → 600
Clear coat correction: 1000 → 1500 → 2000 → 2500 (wet sand, then polish)
Deck Refinishing
Decks are rough, weathered, and full of splinters. You need aggressive removal first, then just enough smoothing to avoid splinter-free feet. If you’re using a random orbital sander, the discs do most of the work.
Old finish removal: 60 → 80
Smoothing bare wood: 80 → 120
Don’t go higher than 120 on decks. The wood needs enough texture to grip the new stain or sealer.
Sandpaper Types and Materials: What’s Actually Different
Aluminum Oxide
The workhorse. Works on wood, metal, and drywall. Self-sharpening as it breaks down, which means it stays cutting longer. This is what you’ll find in 90% of sandpaper sheets at the hardware store. If you don’t know what to buy, buy aluminum oxide.
Ceramic
The premium stuff. Ceramic grains are harder, sharper, and last significantly longer than aluminum oxide. They’re also more expensive. Worth it for heavy stock removal, hardwoods, and metal. Brands like Diablo and Mirka use ceramic blends in their top-tier products.
Silicon Carbide
The wet sanding champion. Sharper than aluminum oxide but more brittle. Used primarily for wet sanding automotive finishes, polishing metal, and working with glass or stone. Those high-grit wet/dry sheets from 3M? That’s silicon carbide.
Garnet
Old school. Softer grain that breaks down quickly but leaves a very smooth finish. Some hand-sanding purists swear by it for final passes on furniture. Not great for power sanders because it wears out too fast.
Zirconia Alumina
The heavy-duty option. Self-sharpening like aluminum oxide but much more aggressive. Used in belt sanders and for serious metal grinding. Overkill for most woodworking.
Top Sandpaper Brands: Honest Breakdown
1. Diablo SandNET — Best Innovation
Diablo’s SandNET design is genuinely different. The mesh-backed discs resist clogging dramatically better than traditional sandpaper. You can shake them out, vacuum them, or even rinse them and keep going. In real-world use, one SandNET disc lasts as long as 5-10 conventional discs. The 50-piece assorted pack gives you 10 discs each in 80, 120, 180, 220, and 400 grit — covers pretty much everything.
Best for: Orbital sander users who hate changing discs constantly.
Downside: More expensive per disc upfront (but cheaper per project).
2. Mirka Gold — Professional Standard
Mirka is what professional cabinet shops use, and for good reason. The ceramic aluminum oxide grain cuts fast and lasts long. The anti-clog coating actually works. Consistent grit quality means no surprises. If you’re serious about finishing work, Mirka Gold is the gold standard. Sold by grit — buy the grits you use most in bulk.
Best for: Woodworkers and cabinet makers who sand a lot.
Downside: Have to buy each grit separately. Pricier than box store brands.
3. 3M Pro Grade Precision — Best Budget
3M is the safe pick. Consistent quality, widely available, and the assorted packs make it easy to grab what you need without overthinking it. Their aluminum oxide sheets handle wood and metal just fine for general DIY work. Not as long-lasting as Mirka or Diablo, but at half the price, they’re a solid value.
Best for: DIYers who need affordable, reliable sandpaper.
Downside: Wears faster than ceramic brands. Clogs quicker on resinous woods.
4. 3M Wetordry — Best for Automotive
If you’re wet sanding auto body work, headlight restoration, or fine finishing metal, these are the go-to sheets. Silicon carbide on a waterproof backing. The assorted pack with 1000, 1500, 2000, and 2500 grit covers the full wet sanding progression. Delivers 10% smoother finishes than their standard line.
Best for: Automotive work, headlight restoration, fine metal finishing.
Downside: Only useful for wet sanding. Not a general-purpose product.
5. Norton ProSand — Contractor Favorite
Norton’s been making abrasives since 1885. The ProSand line uses premium aluminum oxide with anti-loading technology to resist clogging. Good balance between performance and price, and the 9×11 sheet format works for hand sanding and can be cut to fit sanding blocks. The assorted 25-pack includes 60, 100, 150, and 220 grit.
Best for: Hand sanding and sanding blocks. Contractors who buy in bulk.
Downside: Sheet format only — no discs.
Sanding Tips That Actually Matter
The Golden Rule: Never Skip More Than One Grit
Going from 80 to 120 is fine. Going from 80 to 180 is not. Each grit removes the scratches from the previous one. Skip a grit and you’ll spend twice as long with the finer paper trying to remove scratches that are too deep for it to handle efficiently. Your finish will show it.
Let the Tool Do the Work
Don’t press down hard on your orbital sander. Extra pressure slows the disc, creates uneven scratching, and wears out sandpaper faster. Light, consistent pressure with overlapping passes gives the best results.
Change Your Paper Before It’s Dead
Worn-out sandpaper doesn’t sand — it burnishes. And burnished wood doesn’t accept stain. When you notice the paper cutting slower, change it. The cost of a new disc is nothing compared to having to strip and re-sand a blotchy stain job.
Use a Sanding Block for Hand Sanding
Your hand is not flat. A sanding block is. Without a block, you’ll create dips, waves, and uneven surfaces. Wrap your sandpaper around a cork or rubber block and sand in straight lines with the grain.
Vacuum Between Grits
Old dust from coarse grits will create scratches when you move to finer grits. Vacuum or tack-cloth the surface between each grit change. Takes 30 seconds and saves you from mystery scratches in your finish.
Frequently Asked Questions
What grit sandpaper should I use before staining wood?
Sand to 180 grit for softwoods (pine, cedar, poplar) and 150-180 for hardwoods (oak, maple, walnut). Don’t go higher — too-smooth wood won’t absorb stain evenly, leading to blotchy results. Always sand with the grain and wipe with a tack cloth before applying stain.
Can I reuse sandpaper?
Traditional sandpaper? Not really — once the grit is worn or clogged, it’s done. Diablo SandNET discs are the exception. Their mesh design lets you shake out, vacuum, or rinse off the dust and reuse them multiple times. One SandNET disc genuinely replaces several conventional ones.
What’s the difference between wet sanding and dry sanding?
Wet sanding uses water (or sometimes mineral spirits) as a lubricant. The water flushes away debris, prevents clogging, and produces a finer finish. It’s essential for automotive clear coat work and fine finishing above 400 grit. You need silicon carbide paper with a waterproof backing — regular sandpaper falls apart when wet.
How do I know what grit to start with?
Start with the finest grit that will still do the job in a reasonable time. If you’re removing old paint or heavy mill marks, start at 60-80. If the wood is already fairly smooth (like pre-surfaced lumber from the store), start at 120. There’s no award for starting too coarse — you just create more work for yourself.
Do higher grit numbers always mean better?
No. Higher grit means smoother, not “better.” A 400-grit finish on a deck would be wasted effort — the wood needs texture to absorb stain. Meanwhile, stopping at 120 on a dining table would look terrible under polyurethane. Match the grit to the project and the finish you’re applying. If you’re working on detailed projects with an oscillating tool, the same grit principles apply to sanding attachments.
Affiliate Disclosure: Power Tools Insider participates in the Amazon Associates Program. When you purchase through our links, we may earn a commission at no additional cost to you.
Power Tool Insider is reader-supported. When you buy through links on our site, we may earn an affiliate commission at no extra cost to you. This doesn’t affect our recommendations — we only recommend tools we’d actually use. Full disclosure.